Introduction
Docker is nice and cool, but creating a clean image is no simple task.
As complete as the official documentation is, writing a good Dockerfile still requires a lot of practice and most of them aren’t widely adopted.
Creating a lightweight image can be difficult too. It’s easy to overlook Docker’s best practices and bloat your image with useless files.
I’ve been faced with limited registry quotas and disk size on my client’s registry and VMs. When your application’s stack consists of many Docker containers and increasing the quotas or disk size aren’t possible, you must look the other way: reduce the size of your containers and images by taking advantage of your SDK’s tools and respecting Docker’s best practices.
Everything I’ve learned along this journey was a compilation of many articles and pages of documentation I’ve read, videos I’ve watched, and trial and error from my own.
I’ve decided to gather everything I learned in this article, which is a mix of Docker’s best practices and optimisation for Java Spring Boot apps.
This article is intended for beginners.
All you need to know are the main concepts of container, image and Dockerfile: a Dockerfile allows you to build an image, an image allows you to deploy containers.
If you understand those core concepts and know the basic commandes (docker pull, docker run, …) you’re good to go !
Docker 101
It’s no more than a bunch of layers
When pulling an image, you will see something like this:
Using default tag: latest
latest: Pulling from library/nginx
d51c377d94da: Extracting [===========>                                       ]  6.488MB/28.05MB
492c7b58b293: Download complete
587f328750b8: Download complete
60b452932acd: Download complete
c60ea76daae0: Download complete
fb23ee5f039b: Download complete
0b59f5cbcfb9: Waiting
Plot twist, an image doesn’t really exists and is rather a sum of some “layers”.
When you pull an image, you don’t actually download one large file, you rather download all of the layers it consists of, and different images might share layers.
Let’s say you’re pulling nginx in the stable-alpine3.20 version. As mentioned in the name of the image, it’s based on Alpine 3.20.
Next, let’s say you’re pullin Apache in the alpine3.20 version. It’s also built on top of Alpine 3.20.
When you’re pulling the two images, you’re pulling the Alpine layer once. Because both of the images are sharing the same layer, you’re saving space without even noticing it!
✅ An image is made of of layers, different images may share layers!
Ok, but what is actually a layer?
See that Dockerfile?
FROM alpine:3.20.3
RUN apk add openjdk17-jdk maven
COPY my-java-app /src/
WORKDIR /src/
RUN mvn clean package
EXPOSE 8080
CMD java -jar target/app.jar
Almost every Dockerfile instruction (RUN, COPY, FROM, …) is a layer.
FROM adds the base files to your image. RUN allows you to run shell commands which will manipulate files, folders, permissions and more in your image and COPY will add files and folders inside your image…
All of those instructions will modify or add files and will each create a layer.
When building your image, Docker will either use the already existing layer from your machine, if the instruction is unchanged, or will invalidate the cached layer, if the instruction is changed.
A very important rule, is that if a layer is invalidated, all of the layers underneath will be invalidated tool and rebuilt.
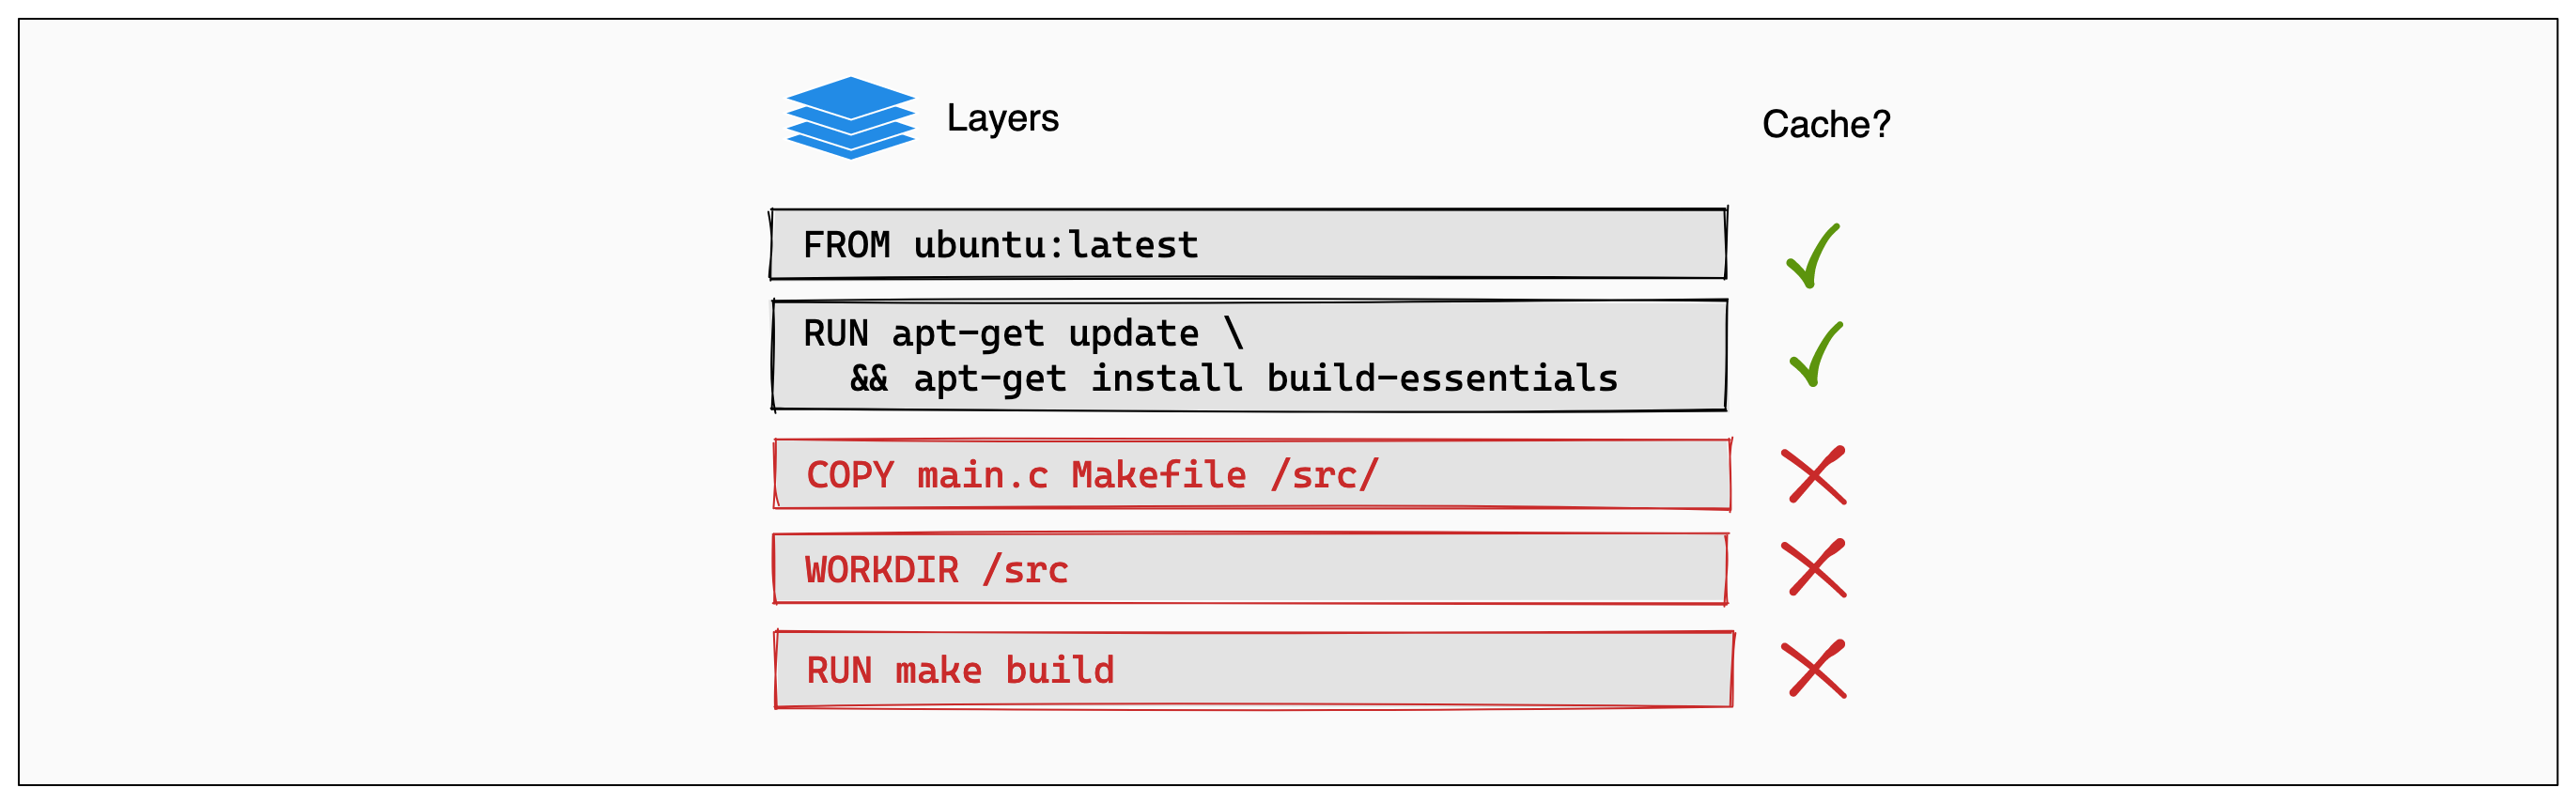
This picture fom Docker’s documentation nicely illustrate how Docker rebuilds or no the layers.
Let’s say you’re building your image for the first time. All of the layers are brand new and shiny.
Now you’re fixing a horrible bug involving timezones (I’m a normal human being, I hate timezones more than anything else, even more than stubbing my toe on the corner of my bed).
The sources of your app have changed, naturally, the COPY layer itself needs to be rebuilt (even though you haven’t changed the COPY command itself, the relevant files have changed). Next, all the layers will be rebuilt too, you wouldn’t want to use the previously cached files when running RUN make build since the source has changed, right?
For this reason, it’s very important to write the instructions in the best possible order.
In the Dockerfile, from top to bottom, first the layers that change less frequently, and then the layers that might need to be rebuilt the most.
And now for the last part about layers, especially about RUN. Each RUN instruction will create a layer. Having too many RUN commands will generate a lot of layers and can be counter productive!
Consider this, 3 layers will be created:
RUN apt-get update
RUN apt-get install -y vim curl
RUN rm -rf /var/lib/apt/lists/*
Instead, you should be doing this, which will create only one layer:
RUN apt-get update && \
    apt-get install -y \
        vim \
        curl && \
    rm -rf /var/lib/apt/lists/*
And let’s talk about this for a second: rm -rf /var/lib/apt/lists/*.
As mentionned before, Docker instructions, e.g. RUN will create files that will be added in our layers. Every distro’s package manager has its own cache to speed up subsequent installs. It’s great for a standard usage on your computer, buts it’s useless in a Docker container, so we should clear the cache!
Here, the whole point of combining all the commands in one RUN instruction is that by the end of the RUN instruction, the package manager cache, which was updated with the first apt-get install command, will be deleted. The cache wont exists in our RUN layer, optimizing disk usage and layer size!
Whereas in the not good version, the cache gets filled during RUN apt-get install -y vim curl, so it’s added in the layer, and is removed in the RUN rm -rf /var/lib/apt/lists/*. It’s basically extra useless instructions that will add useless layers and make you image heavier for no reason.
Imagine you’re moving house. You better fill the truck as much as possible to save useless trips right ?
✅ An instruction in a Dockerfile will build a layer
✅ During the build phase, Docker will reuse an already built layer if possible
✅ If a layer has changed, it will be rebuilt, alongside all the layers underneath
✅ From top to bottom, layers that need to be updated the less to the most.
✅ Often, RUN instructions should be collapsed to optimize reusability and build cache usage
✅ Don’t forget to clean your package manager’s cache!
Stages are actually rocket science!
Before going any further, I’d like to introduce you to stages with this Dockerfile:
FROM alpine:3.20.3 AS builder
RUN apk add openjdk17-jdk maven
WORKDIR /opt/app
COPY src/ .
RUN mvn clean package

FROM alpine:3.20.3
RUN apk add openjdk17-jre
WORKDIR /opt/app
EXPOSE 8080
COPY --from=builder /opt/app/target/*.jar /opt/app/*.jar
CMD java -jar /app/app.jar
As you can see, there are two FROM instructions, which mean, two stages. This is a multistage Dockerfile.
Let’s compare stages with rocket science, but fear not my youngling although, it might seem frightening, but it’s actually pretty easy.
Let’s use this poorly drawn picture I came up with (I also take commissions if you need crapy graphics):
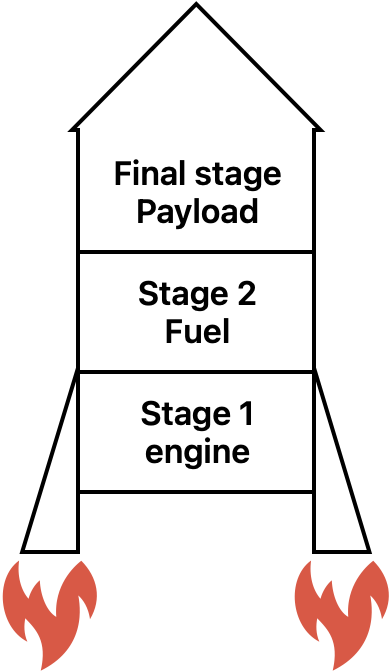
Rockets have only one goal, send the final stage aka the payload to its destination (wether it’s a probe, a satellite, …) by using all the other intermediate stages (boosters, fuel, …).
The intermediate stages get all disposed because they serve no purpose once the payload has reached its destination.
Docker stages are actually the same: intermediate stages are here only to help building the final stage.
On the previous example, we have two stages.
The first one:
FROM alpine:3.20.3 AS builder
RUN apk add openjdk17-jdk maven
WORKDIR /opt/app
COPY src/ .
RUN mvn clean package
Defined with the builder alias, and builds the java app using mvn clean package.
The second one:
FROM alpine:3.20.3
RUN apk add openjdk17-jre
WORKDIR /opt/app
EXPOSE 8080
COPY --from=builder /opt/app/target/*.jar /opt/app/*.jar
CMD java -jar /app/app.jar
The “usual” applicative stage, allowing us to run the application. See the COPY --from=builder? The executable jar is copied from the builder stage to the applicative stage. Everything else is discarded, like the intermediate stages on our rocket!
And now for the icing on the cake, the rule that stipulates that if a layer is invalidated, all the next layers are too, is independent from a stage to another!
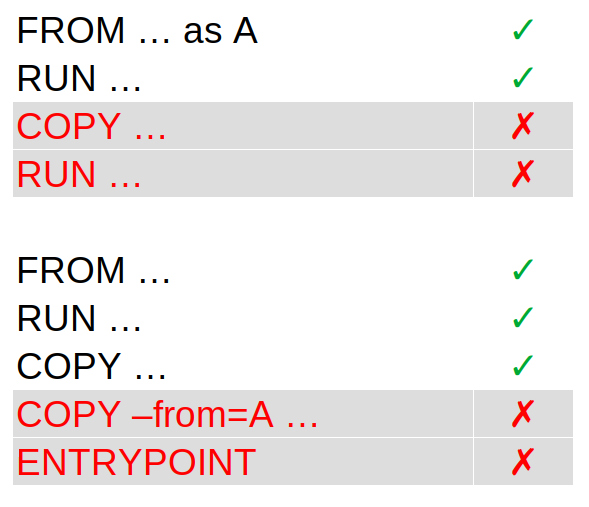
If layers are invalidated in a stage, it doesn’t invalidate the layers in the next stage. Here, where are only invalidating the layers starting from COPY --from=A ... because the files were rebuilt in the first stage. Otherwise, the previous layers remain unchanged.
✅ A stage is an “intermediate” image, starting with a
FROMinstruction
✅ Intermediate stages are discarded after the build, they serve one purpose, build the final stage, the final image
✅ Layers are independent from one stage to another. Invalidating layers of a stage doesnt mean the next stages will be entirely invalidated
How to actually optimize?
Now that we’ve covered Docker’s best practicies, let’s apply everything in a Java Spring Boot app.
Even if it’s basic, I’d like to remind you the difference between JVM, JRE and the JDK:
- JVM: the platform-specific binaries to run java apps
- JRE: the runtime, containing Java classes (packaged in modules) and the JVM
- JDK: all the build tools, with the JRE
So the first tip to save space: you don’t need a JDK Docker image to run an application, you only need the JRE: the JVM and the Java modules.
$ bin/jimage list lib/modules | head -n50
jimage: lib/modules

Module: java.base
    META-INF/services/java.nio.file.spi.FileSystemProvider
    com/sun/crypto/provider/AESCipher$AES128_CBC_NoPadding.class
    com/sun/crypto/provider/AESCipher$AES128_CFB_NoPadding.class
    ...

Module: java.compiler
    javax/annotation/processing/AbstractProcessor.class
    javax/annotation/processing/Completion.class
    javax/annotation/processing/Completions$SimpleCompletion.class
    javax/annotation/processing/Completions.class
    javax/annotation/processing/Filer.class
    ...
Using jimage from the JDK, we can list all of the modules and their classes.
Introducing jdeps …
… and then jlink …
… with a hint of Spring layers
Be careful with the pitfalls!
The garbage collector is your friend
Reflection means trouble
Where do we go now?
Before you leave this page to drown yourself in alcoholic beverage after reading this huge wall of text, give me a chance to give you a quick summary of what we’ve learned here.
When it comes to Docker, it’s dead simple. You can’t go wrong by applying as many best practices as possible to reduce your image size and build time, the main ones being:
- Collapsing
RUNinstructions when it make sense - Using a multi-stage Dockerfile if possible
- Ordering the layers form least frequently updated to most frequently updated
- Using
RUNwith mount
Then, when it comes to a Java app, extracting Spring Boot’s layer instead of using a fat jar is a no brainer.
Jlink alongside Jdeps is another story. If space is really an issue (working with embedded / low cost hardware), it’s the way to go. But keep in mind enabling all the flags to reduce the runtime as much as possible comes with side effects like less informations in stack traces in case of an exception.
And if your application relies on dependencies using reflection, you will have side effects, side effects you can only prevent if you have an exhaustive automated test suite (unit, integration and/or functional tests).
In short:
- Best practices + Spring Boot layers = this is the way
- Jdeps and Jlink = maybe but be careful !